

Step 1 — Confirm the data is being collected
Open a discovered CUCM cluster → Device Investigator → Collections. Open "Cisco: CUCM Cluster Information" and confirm CUCM Version shows a real release value. Open "Cisco: CUCM Cisco Services Configuration" and confirm the WebDialer Service Status is present.
What the version string looks like. The CUCM Version object returns the full software build in the form Major.Minor.Release.Build — for example 11.5.1.15900-18 or 15.0.1.12900-x. Note this is the application release and is distinct from the OS Version object, which reports the underlying appliance OS kernel (e.g. 2.6.32-573.18.1.el6.x86_64). Match against CUCM Version, not OS Version. The collected string identifies the release train; it does not contain the advisory's "SU" label, so the detection below flags affected trains and prompts you to verify the exact SU level (see the note in Step 2).
Step 2 — Add a custom alert to the Dynamic Application
An alert is a formula SL1 evaluates each time data is collected; if it evaluates true, the ScienceLogic AI Platform raises an alert that an event policy can turn into an event. In an alert formula, collection objects are referenced by ID as o_<id>, and the result() function passes a value forward for display in the event message.
- Go to System > Manage > Dynamic Applications and click the wrench icon for "Cisco: CUCM Cluster Information".
Upgrade note: editing a stock PowerPack Dynamic Application is overwritten on PowerPack upgrade unless you enable System > Settings > Behavior > Enable Selective PowerPack Field Protection. Turn that on first.
- Open the [Alerts] tab and add a new alert. Note the object ID of the CUCM Version object from the scrolling object list (shown as
o_<id>) — you will reference it in the formula. - Enter a Formula that evaluates true for an affected release train. Click the CUCM Version object in the scrolling list to insert its ID (shown here as
o_11681— the ID varies by system, so use the one from your list), and ther()button to insertresult(). To flag both affected trains (14.x and 15.x) and pass the version forward for the message:# o_11681 = CUCM Version object (use your system's ID)('o_11681'.find('15.0') == 0 or 'o_11681'.find('14.') == 0) and result(o_11681)The single quotes around'o_11681'are required because.find()is a string operation..find('15.0') == 0matches when the version string starts with "15.0".Why match the train, not the SU? The collected version (e.g.
15.0.1.12900-x) uses a build-number format that does not match the advisory's SU labels (15SU4, 14SU5) — the two are different namespaces and reconciling them requires Cisco's release-to-build mapping. So this alert reliably flags clusters on an affected train and prompts verification of the exact SU against Cisco's advisory. That is the dependable, accurate signal; SU-precise matching would require encoding Cisco's build-number-to-SU mapping and is an optional enhancement. - Set a Log Message that uses the substitution characters, e.g.
CUCM version %V is on a release line affected by CVE-2026-20045 / CVE-2026-20230 — verify SU level against Cisco advisory and patch.%Vis populated by theresult()function. - (For the SSRF) optionally add a second alert on the "Cisco: CUCM Cisco Services Configuration" Dynamic Application referencing the WebDialer Service Status object that evaluates true when the service is Started — this gates the SSRF (CVE-2026-20230), which only applies when WebDialer is enabled.
- Set Active State to Enabled and click Save.
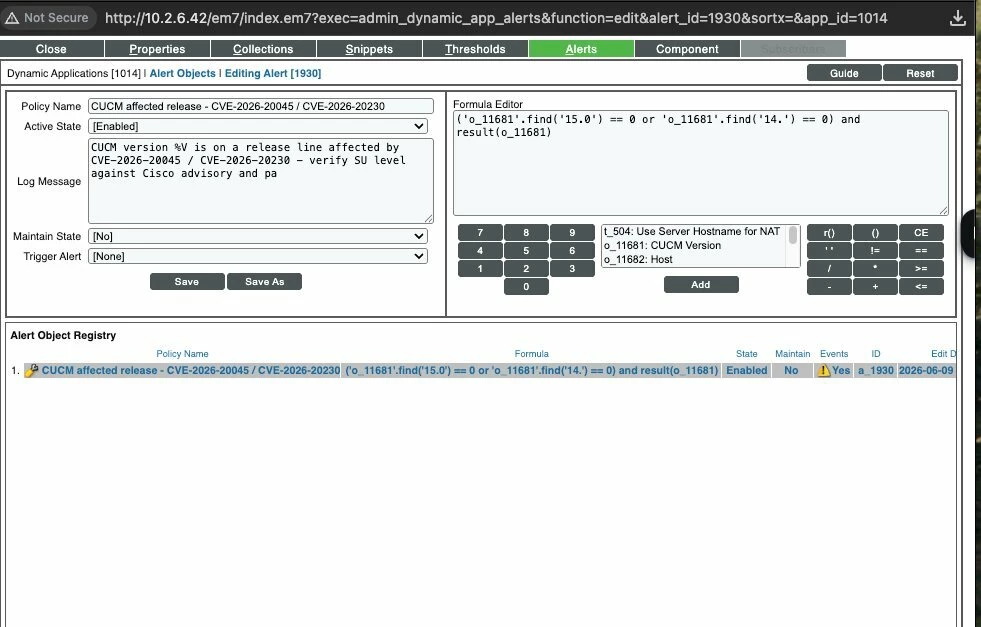
Alert Objects page — Policy Name, Formula Editor with the train-match formula (CUCM Version object o_11681 selected in the object list), Log Message with %V, and the saved alert in the registry below.